
This blog is mainly about the method of upgrading the brakes to hydraulic brakes.
Generally, electric scooters with disc brakes provide the safest riding for the riders. The powerful braking ability makes the electric scooter can be easily stopped in both wet and dry conditions. In addition, the disc brakes are lightweight and friendly to maintain. You can easily find disc brakes on the high-performance electric scooters.
For the disc brakes, it can be classified into two main kinds, cable brakes and hydraulic brakes. Each type has their own advantages, the cable brakes have a stronger performance in most conditions, but the hydraulic brakes are more friendly in terms of maintenance and usability. You can find more detailed information in “What’s the Difference Between Disc Brakes and Drum Brake?“.
Therefore, Varla Scooter has upgraded to fully hydraulic brakes in November 2020.
Considering that some customers who bought the Varla Eagle One before November are not fully equipped with hydraulic brakes, we are happy to send you a pair of hydraulic brake for free. Please contact our after-sales team customer@varlascooter.com directly and leave your order number!
This video aims to help our customers and friends who need to replace the brakes!
Long story short! Let’s get into this.
You can see them all in the video below, or read on if you’re more of a word person!
Before Installation:
-
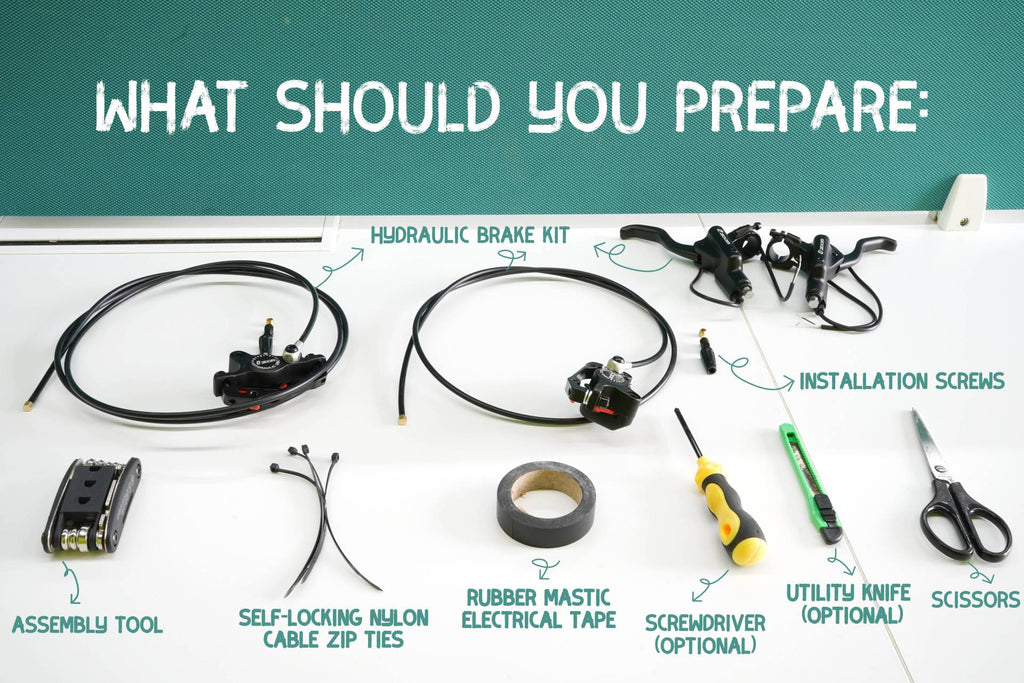
Items needed:
- Hydraulic Brake Kit
- Installation Screws
- Rubber Mastic Electrical Tape (for electrical insulating and moisture sealing applications)
- Self-Locking Cable Zip Ties
- Assembly Tool
- Utility Knife (Optional)
- Screwdriver (Optional)
- Scissors
-
Turn off the power to ensure safe operation.
Remove the Old Cable Brakes:
-
Use the assembly tool to loosen the screws on the handlebar, and then remove the handlebar and cover.
-
Find the connection point between the brake levers and the brake cable, then cut it off.
Firstly, you need to cut off the zip ties, remove cable sleeving (Open Self-Roll Braided Cable Sleeving Auto Wire Harnessing-Sheath) that binds the cables, and the black gauze tape (Self-Adhesive Elastic Bandage Gauze Tape) on the inner layer. Pay attention to save the cable sleeving and gauze tape. (We consider that the possibility of the gauze tape losing its viscosity, the hydraulic brakes package also included an extra 30cm gauze tape.) Then, slowly pull out the two brake cables near the handlebars to find the connector.
At this point, use scissors to cut off the outermost insulating sleeve slowly, and you will see the connector in the picture below. Then separate the three cables.
We recommend sticking this thread on the stem with tape to prevent the lower cable from slipping off.
-
Then begin to remove the brake calipers.
Take the brake of the rear wheel as an example:
Firstly, pull off the end cap of the brake cable. Then loosen the screw holding the brake cable and pull the cable out directly.
Then loosen the two screws fixing the brake block (be careful to save them), and take out the brake caliper. Then draw the cable from the side and the stem.
The same steps to the front brake.
*Don’t throw away the brake cable, it may help you a lot later.
-
At this time, loosen the screw of the cable brake levers and take them out.
At this point, we have already removed the cable brakes, and hydraulic brakes are about to be installed.
Install Hydraulic Brakes:
-
First, install the hydraulic brake levers on the handlebar and tighten the screws.
-
Now you can put on the handlebar grip, remember to put on the cover first, install them to the handlebar, and tighten the screws.
-
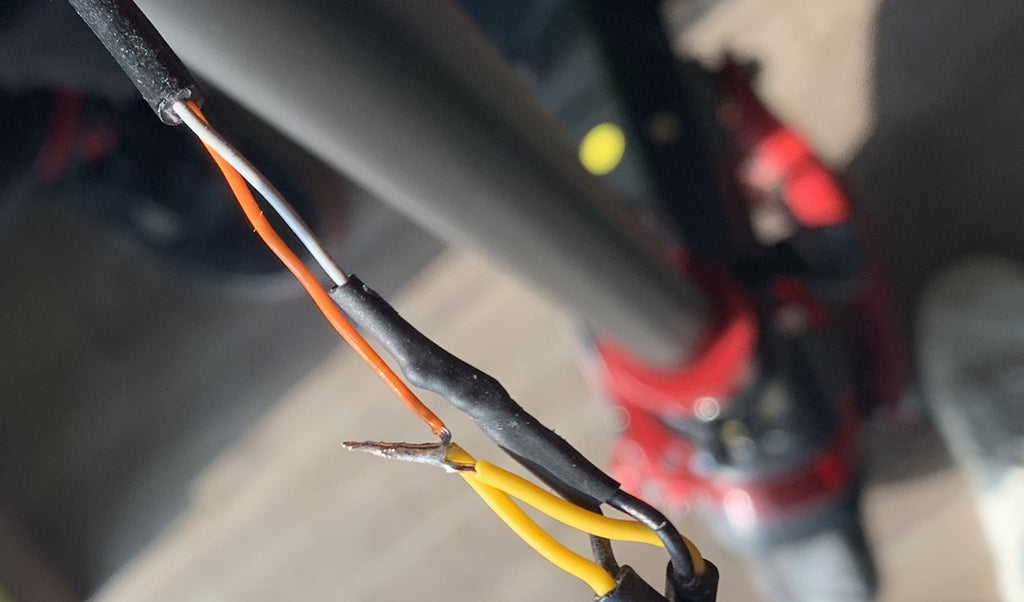
A very critical step. Connect the brake cables.
First, compare the cables’ length with the old brake levers, and cut the excess cable after leaving a length of 2-3cm. Then use scissors to gently cut a small depth of 1cm from the end of the cable. When you pull out the outer rubber sleeve, you will see two small cables inside, one white and one black.
Connect the two black cables to the gray one and the two white ones to the orange one. Then, use insulating tape to wind the two cables separately tightly. Finally, wrap the two cables with insulating tape.
*Please note that insulating tape must be used
*The color cannot be connected wrong. Once the wrong connection is made, the brake will not be used.
-
Adjust the brake levers and tighten the screws.
-
Install the brake calipers.
Firstly, compare the length of the brake lines. The longer line is the rear brake, and the other is the front brake. Please do not install it wrong.
We will take the rear wheel brake as an example.
Take out the hydraulic brake line. First, loosen the dust-proof screw on the end of the line and go straight through the channel on the deck’s right side from back to front. Then follow the stem, from bottom to top, pierce out.
The front brake line is the same step, and it only needs to go through the stem.
* Tips for go through the stem faster: wipe the old brake’s line with the hydraulic brake one with tape, and then use the thinner brake cable as a guide to pass through the stem from bottom to top. It is thinner, so it is easier to pass through the stem.
Finally, take out the orange protection pad and install the caliper on the rotor. Use the before screws to fix the brake on the spring arm—the same operation for the rear brake.
-
The most important step is to connect the brake lines to the brake lever.
Firstly, put the three screws into the hydraulic line in large, medium, and small, and then loosen the screws on the brake lever.
*Be careful not to tighten the brake lever because there is liquid in it. If the liquid leaks out, the hydraulic brake will be useless.
Connect the hydraulic brake line to the oil outlet, tighten the screw to ensure the seal. And try to pull the brake lever if no liquid leaks, which means that the screw is tightened. Then tighten the protective covers.
Final Adjustment:
1. Put the cables exposed from the front of the handlebars into the stem first, and then install them back according to the removal steps. Wrap the cables one by one with gauze tape and cable sleeving, and finally re-tie them with a zip tie.
2. Adjust the brakes.
Adjust the two screws of the brake to ensure that the distance between the brake rotor and the two pads is the same. Then slightly lift the tire and rotate it, if there is no noise, which means it’s adjusted well.
Final word
Well done!
Is it not so difficult to replace the brakes yourself? If you know how to replace the inner tube yourself, I believe the change to hydraulic brakes will not trouble you! Please check out our previous blog for more electric scooter maintenance guide.
Leave a Reply
You must be logged in to post a comment.